RGB + CMYK
Gamut is another word for range, and this is used when talking about CMYK and RGB.
There is a bigger gamut in RGB than there is in CMYK.
RGB files are smaller
Gamut
By choosing View > Gamut Warning, it puts a grey overlay over the image to show you where the colours will be changed during print as it is out of the gamut range.


By changing the Hue/Saturation you can alter the gamut so that there is none.


To change the gamut on a selected area that needs it without affecting the whole image you can add a mask and an adjustment layer.

Black is what isn't visible, and white is what visible when you use a layer mask. By using the paintbrush tool you can brush away on the mask and eliminate the gamut.


Adobe

Swatches
To delete swatches in Photoshop there is no easy way around it. You can either click and drag a swatch to the trash bin, or hover over a swatch, press alt and click.


To save a swatch you have to have at least one colour in the palette. To add a colour to a swatch, you just double click on the foreground colour and Add to Swatches.

The top warning lets you know it is out of gamut range in CMYK, and if you click on it, it gives you the nearest colour that is good for printing. The second warning says that it isn't a web safe colour, but if you click it, it will give you the nearest web safe colour.

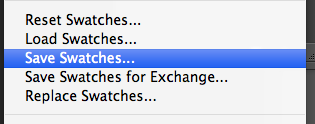
Save Swatches is for if you are just going to use the swatch in Photoshop, and the second option for Exchange, is for if you are going to use it in other programmes.
When you click on the foreground colour you can also look at Colour Libraries which shows you all of the Pantone colours.

Creating a Duo tone image
Creating a duo tone image has to be a grayscale image.
Duo = two
Tone = ink
I went onto Image > Mode > Duotone Options.
Clicking on the black square lets you change what ever colour you want.

By going on the Colour Libraries you can pick the Pantone colour you want.

By clicking on the first box, you can change the curves.

You can create it duotone by choosing the option from the drop down box that is there.


You can then pick the colour you want

The mask will change according to how you paint it


You can also change the opacity

This is good for if you want to do spot varnish, as you can tell the printer don't apply ink where it is black on the mask - apply a spot varnish there.
To save it, spot colours needs to be selected and it can either be saved as a Photoshop or Tiff file

No comments:
Post a Comment